The plugin’s main options tab contains the basic default settings for the operation of the plugin. The first section of the main options is Manage Options and it is divided into four sections:
- Content
- New Feature Settings
- Other Settings
- Pages
- Stylesheet
The second section after Manage Options is for selecting any Custom Post Types to be managed by the plugin.
NOTE: For most of these options, if you use a cache plugin, you will need to clear it if you change one of these settings.
Content
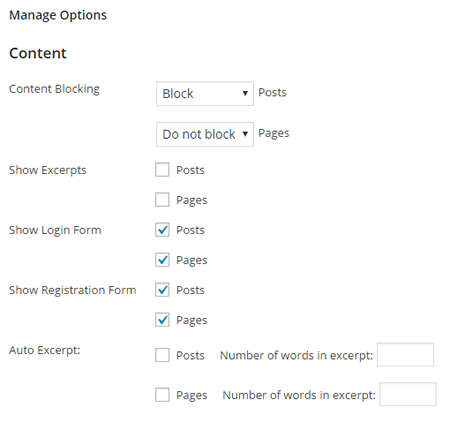
This section handles content blocking settings and how that will be displayed. There will be a setting for each post type that the plugin is set to handle. By default, this will be Posts and Pages. However, if custom post types are identified in the Custom Post Types section, those will be added here.
(Keep in mind that not all CPTs function the same, and not all of them behave exactly like posts. Some CPTs may work well with standard WP-Members settings in the Options tab whereas others may require special handling.)
Content Blocking
This determines the default setting for each post type. Settings are “block” or “do not block”. As a default setting, any post of the identified post type will receive this handling if it does not have a specific setting at the post level (set in the post editor window). [See Managing Content for in-depth information on blocking posts and pages.]
Show Excerpts
This will show any excerpt before the auto excerpt or “read more” tag on a protected post type when the user is not logged in. Note that this is specifically for the single post view and does not effect post summary pages such as archives or search results. [See Managing Content > Show Excerpts]
Show Login Form / Show Registration Form
By default, the plugin will display a login and registration form in the place of blocked content. Whether these are displayed or not by default can be managed by post type with these two settings. The default setting at install will display both login and registration on blocked posts and pages instead of the content. Check or uncheck these options based what you want to display or not display.
Auto Excerpt

This setting allows you to automatically define an excerpt for each post type. When used, the use of the “read more” tag is not necessary, although if the tag is used, the excerpt will take a defined excerpt as a priority over the automatic one.
This setting makes it easy to get up and running, especially on a site that already has existing content to be blocked. This way you do not need to go through every post and set a “read more” tag.
It is important to note that the length of the Auto Excerpt INCLUDES any additional content in the content that might not show to a user, such as the HTML tags associated with images. If you have an image in the excerpt, all of the tags will be counted as part of the word count. It’s not a major deal – just make sure you account for this when setting the length.
New Feature Settings
These are settings that are new and being worked into the plugin as options. Most often, they will become the plugin’s new defaults or official settings at a future date and time.
See “New Feature Settings” for current options.
Other Settings
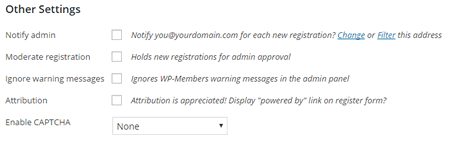
This section of settings handles some generic settings such as notifying the admin of new registrations, setting admin approval (moderated registration), and use of CAPTCHA.
Enable Products
This setting enables a special custom post type (CPT) for creating “Membership Products.” Products can serve many purposes and are not necessarily limited to a single construct. They can be used for levels, membership groups, single-page access, etc. They can expire or not expire. When you enable this setting, it adds a “Membership” menu item in the WP Admin Menu. Generally, this menu item will appear below the Comments menu.
Notify Admin
When turned on, the admin will receive an email notification for any new registrations. This is especially helpful when Moderate Registration is turned on. By default, mail is sent to the admin address specified for the blog found under General > Settings. If that notification needs to be sent to someone other than the default admin address or needs to be sent to multiple addresses, that can be changed with the wpmem_notify_addr filter.
Moderate Registration
If you wish to approve a registration manually prior to allowing them access to the site, turn on Moderate Registration. With this turned on, any new users must be approved by a site admin prior to receiving access. Users can be approved individually via the user detail page. This can be accessed via WP’s admin menu Users > Users or the plugin’s bulk user management screen under Users > WP-Members™. [See Registration > Moderating Registration for more information]
Account Confirmation Link
This feature sends a new user a confirmation link when they register. They will not be allowed to access the site until they have confirmed their account.
If the user does not confirm the account, the link will expire in 24 hours and the user would have to register again.
IMPORTANT: If you activate this feature on a site with existing users, none of those users will have been marked as confirming their emails. You can confirm existing users manually in the Users > All Users screen, or there is a code snippet you can use to mark all existing users as confirmed.
IMPORTANT: This feature is not currently compatible with WooCommerce integrations!!
Additional Configuration for Confirmation Link
You must have a user profile page set up with the [wpmem_profile] shortcode and the location of the page set in the plugin’s page settings (See Pages > User Profile URL below). Without this, the confirmation link will lack the full domain path when added to the email.
It is recommended that you configure the plugin to allow users to create a password at registration. There is no need to send the user’s password via email. In fact, that capability will eventually be phased out as the Activation Link feature becomes standard in the plugin. To enable a password as part of registration, enable password (and, ideally, confirm password) in the WP-Members Fields tab.
It is recommended that you edit messaging and emails accordingly. The successful registration message should be updated in the Dialogs tab to inform the user that they will receive an email requiring them to activate their account before access. Similarly, the process will automatically include the activation link at the bottom of the new registration email. If you want to customize where the link is placed in the email, use the [confirm_link] shortcode in the email.
Ignore Warning Messages
WP-Members™ has a number of warning messages that it will display in the WP Admin Panel. Some of these are for WP settings conflicts and others are specific to the plugin. You can turn the warning messages off with this toggle.
Attribution
This enables the display of a “powered by WP-Members” tag at the end of the registration form. This is a freely available plugin that is supported solely by users who purchase a support subscription. If you use the plugin and find it useful, please consider adding the attribution link.
Enable CAPTCHA
Turning this on will include a CAPTCHA in the registration process. WP-Members™ supports reCAPTCHA version 1 and 2 as well as Really Simple CAPTCHA. reCAPTCHA requires an API key. Really Simple CAPTCHA requires that the Really Simple CAPTCHA plugin be installed as well. Please note that while the plugin supports reCAPTCHA version 1, its use has been deprecated by Google and it is only maintained here for legacy purposes (people who have not updated). New installations should only use version 2. [See Registration > Using reCAPTCHA]
Note: CAPTCHA is not supported by default on the login forms. If you use a plugin that adds a CAPTCHA to the wp-login.php form, you will need to address that. If you want to add reCAPTCHA or Really Simple CAPTCHA to the login form, that can be added in using the wpmem_login_form_rows filter and authenticated with the wp_authenticate_user filter (subscriber content examples for reCAPTCHA and Really Simple CAPTCHA).
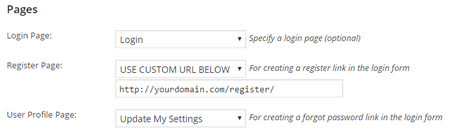
Pages
This section identifies certain specific pages that can optionally be set up. These are optional, although recommended. Keep in mind that these settings merely identify the location of the page so that the proper link can be generated. These settings DO NOT create the pages or add the specific shortcodes used. That is up to the user to set up so that you can have them configured the way that you want them and avoids the unpleasant possibility of overwriting something on a page you created that you did not intend to use for this purpose.
Each of the three settings operates the same way using a dropdown selection.
- No setting is selected by default.
- If a page is set up with the plugin’s shortcode for this page, it can be selected in the dropdown list.
- If some outside process is needed/desired for these, a custom URL can be identified by selecting “use custom URL below” from the dropdown selector (see image example).
Login Page
Identifies the location of a specific login page. The basic install does not make use of this setting, but it may be desired for certain customizations (its location can be retrieved with the API function wpmem_login_url()). Some of the plugin’s extensions utilize this setting, most specifically the Advanced Options extension. [See Page Shortcodes]
Register Page URL
Establishes a page specifically for registration. Specifying the URL of your optional Register Page in this field will cause the plugin to add a Register Link to the login form in both the main content area and the sidebar widget. The page location can be retrieved with the API function wpmem_register_url(). [See Page Shortcodes]
User Profile URL
The User Profile Area is where users on the front end can update their password and registration information. The Lost Password Reset feature is also maintained on this page. Specifying the URL of your optional User Profile in this field will cause the plugin to add a Forgot Password Link to the login form in both the main content area and the sidebar widget. Its location can be retrieved by the API function wpmem_profile_url(). [See Page Shortcodes]
Stylesheet

WP-Members has a default stylesheet that it will load. If you have a custom stylesheet, you can identify its location in the “stylesheet” field in the main options. The value you enter must be the complete URL path to the stylesheet. Enter the FULL PATH to the location of your stylesheet. Test this path in your browser. If it cannot display when directly browsed to, it will not load when a page loads.
If you have a custom stylesheet but are not sure where to keep it, it should be outside the plugin folder* somewhere that will not be overwritten by upgrades. The general wp-content folder and the wp-content/uploads folder are acceptable, as is somewhere outside of your WordPress instance.
*The exception to this is if you use one of the previously available WP-Members stylesheets. These remain packaged with the plugin for legacy purposes. However, it would be wise to copy them to an outside location in case this ever changes.
Also [See Customizing Forms]
Custom Post Types
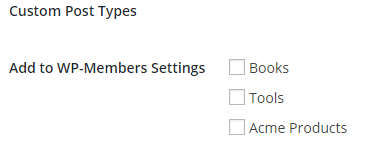
The plugin can be configured to handle Custom Post Types by identifying the CPT to the plugin. This will add the CPT to the plugin’s main Content settings.
Keep in mind that every CPT is different – they are by nature “custom” and not all CPT will behave in a manner that allows WP-Members to handle it the same as a regular post or page. So selecting a CPT to be handled by the plugin does not guarantee that it will be blocked. It will depend entirely on the given CPT. It is for this reason that CPTs are not automatically added to the settings, since we cannot assume that a given CPT will be able to be handled directly by the plugin.
For each CPT, there will be a checkbox option to add it to the WP-Members settings. Any CPTs selected will be added to the settings for the main Content settings. Select the CPTs to add and save your changes.