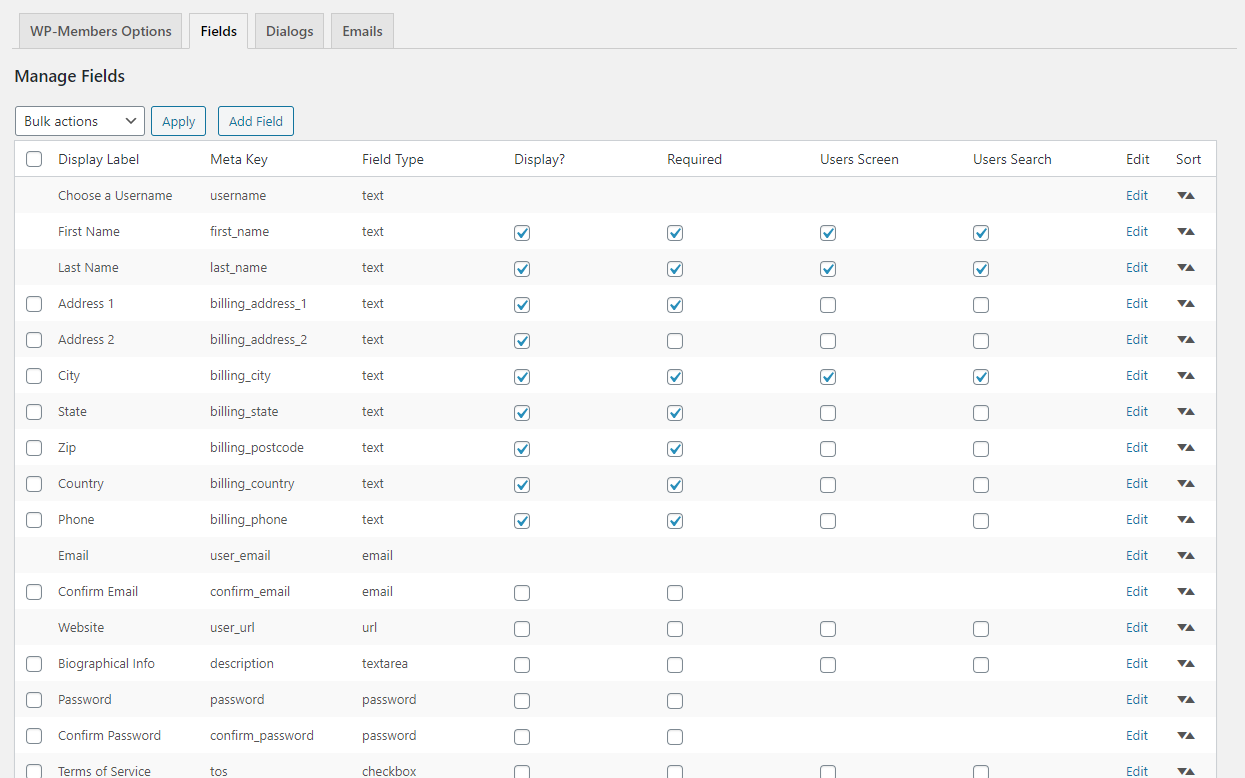
This settings screen allows the administrator to establish what fields are displayed in the registration form and which fields are required.
Check “Display” for which fields you want displayed in the registration form. Any fields not selected to display are admin use only.
Check “Required” for whether entering data for this field is required or not.
To save any changes on this screen, select “Save Settings” from the “Bulk Actions” menu at the upper left or lower left of the fields table. Then click the “Apply” button. (The bulk action menu is a component of the WP list table used to generate the field manager table, so it should be familiar as it is used elsewhere in the WP admin.)
Fields loaded into an array in the WP Options table at plugin install. [See Choosing Fields for information on how add/delete fields and change the field order]
The following fields load into the plugin at install:
- Username (meta_key:user_login, WP native field)
- First Name (meta_key: first_name, WP native field)
- Last Name (meta_key: last_name, WP native field)
- Address 1 (meta_key: billing_address_1, matches default WooCommerce native billing field)
- Address 2 (meta_key: billing_address_2, matches default WooCommerce native billing field)
- City (meta_key: billing_city, matches default WooCommerce native billing field)
- State (meta_key: billing_state, matches default WooCommerce native billing field)
- Zip (meta_key: billing_postcode, matches default WooCommerce native billing field)
- Country (meta_key: billing_country, matches default WooCommerce native billing field)
- Day Phone (meta_key: billing_phone, matches default WooCommerce native billing field)
- Email (wp_users field: user_email, WP native field)
- Confirm Email (not stored)
- Web site (wp_users field: user_url, WP native field)
- Biographical Info (meta_key: description, WP native field)
- Password (wp_users field: user_pass, WP native field, hashed)
- Confirm Password (not stored)
- TOS (meta_key: tos, stored value: “agree”)
None of these fields are mandatory except for Email. You may select which fields are used for registration by selecting “Display”. Any fields not selected to display are admin use only. Any field may be selected as a required field.
Note that some fields are noted as matching WooCommerce native fields. This is ONLY because there are a lot of users who integrate both WP-Members AND WooCommerce together. You do not need WooCommerce to use WP-Members at all. Creating these as initial field meta is simply to make initial integration easier. You do not need to keep these fields (see below regarding removing/deleting fields).
Field order can be changed by drag-and-drop. Simply select the field you want to move and drag it a new location in the table order.
You may remove/delete any fields that are not used. You may add any custom fields you want by using the Add Field form. Existing fields can be edited, with the exception of WP native fields. Any field that is editable will have an edit link in the last column.
WP Native Fields indicates which fields are part of WordPress® and are therefore already part of the User Detail Page. The data for any non-native fields will be found at the bottom of the user profile page under the heading “WP-Members Additional Fields”
Selecting “User Screen” will add a column for the field in the User Screen (Users > All Users).
Selecting “Users Search” adds the field to fields searched when searching users on the User Screen (Users > All Users). By default, WordPress only searches username and email address when searching users on the User Screen. If you want/need more relevant search results, you need to add fields to be searched. Note however that adding too many fields to the search will make your search results less relevant.
Supported field types for form fields are:
- text
- textarea
- checkbox
- multiple checkbox
- select
- select multiple
- radio
- password
- image
- file
- url
- hidden
- number
- date (Note that date is not a fully supported HTML input type in all browsers)