Block Posts by Default
Under the Options tab in the plugin admin panel, the first option is Block Posts by Default. Turning this on will do what it says, “block all posts by default.” Likewise, if you leave it off, all posts will be left unrestricted by default. Whatever you have here is what we will refer to as the “default setting for posts.” We will discuss how to override this setting at the individual article level separately.
Something that is important to note about posts is that there are many places that a post can show up. There are theme pages, such as the home page, archive, and search, that will show either full articles or excerpts, depending on whether you define an excerpt or not. You can define an excerpt either using the excerpt field in the post editor, or you can use what is known as the “read more” tag. Either of these methods will cause WP to only display a “teaser” of your content on one of these summary pages rather than full content.
In order to protect posts, WP-Members™ requires that you use an excerpt, preferably by use of the “read more” tag. In this way, your specified excerpt will display to anyone on the summary pages, but a registered user must be logged in to view the full content.
There are two ways to handle using the “read more” tag. You can do it manually by adding the “read more” tag at the point you want to restrict the post from non-registered users. This will create your “teaser” content to be used on summary pages and will restrict the remainder of the content unless a user is logged in.
 Alternatively, you can set up an automatic excerpt to add a “read more” tag to posts when they are displayed. This is the plugin’s Auto Excerpt setting which is found in the plugin’s main options tab. The Auto Excerpt allows you to specify a specific number of words to create the excerpt.
The Auto Excerpt setting is subordinate to the “read more” tag. In other words, if the “read more” tag is present in a post, that will be used instead of the excerpt generated by Auto Excerpt. In this way, you can quickly get up and running on a site with existing content by using the Auto Excerpt and you can fine-tune your excerpts using the “read more” tag later. Or you can use the “read more” tag in situations where you need a specific excerpt rather than the automatically generated one.
The Auto Excerpt result can be filtered with wpmem_auto_excerpt.
Override the Default Setting for Posts
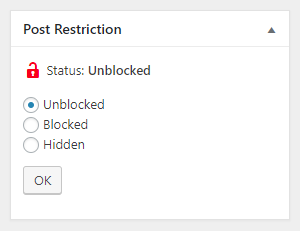
 What if you have set the default to block all posts by default but you have some content that you would like anyone to be able to view? In the standard WP block editor (or “gutenberg”), the Post Restriction box will be at the bottom of the “Document” tools. If you are using the WP Classic Editor, it will be in the upper right hand corner of the Post and Page editor windows. This will allow you to override the default setting you have for Posts (or Pages, when in the Page Editor).
For example, if you have set the plugin to block posts by default, you can select the option to unblock this individual post selecting “Unblocked” and updating the post. That’s all you need to do.
There are three options available for the post’s restriction status:
- Unblocked – with this setting, the post can be viewed by any user.
- Blocked – this setting requires a user to be logged in to view content beyond any allowed post excerpt (either by the “read more” tag or the Auto Excerpt setting).
- Hidden – this setting removes the post from existence unless the user is logged in. It will not show in any archive templates or search.
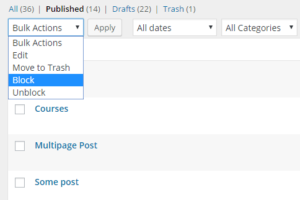
 Setting individual posts as unblocked, blocked, or hidden can also be done in bulk from the Posts > All Posts screen. WP-Members adds block, unblock, and hide actions to the bulk menu at the top and bottom of the posts table. You can select individual or multiple posts and apply the setting with the bulk action.
All posts that have a setting opposite that of the default will be indicated as such in a column at the right of the table. For example, if posts are blocked by default, the column heading will be “Unblocked?” and any unblocked posts will have “Yes” in the column.
Custom Post Meta
The checkbox takes the place of the plugin’s former method of setting a custom field (post meta). However, the information on the post meta custom field is discussed here because (a) that is what the checkbox setting is, and (b) you may need this information if you are seeking to do some custom programming that might display all free posts, or some other custom action such as putting an icon next to posts based on blocking status. These are things you would need to know how the meta fields are set so that you could filter accordingly.
The custom post meta that is set is “_wpmem_block”. The underscore (“_”) indicates that this post meta will not show in the custom fields dialog. A value of “1” is blocked, “0” is unblocked.
If old post meta values of block/unblock exist in your installation (pre version 2.9.8), you can edit, change, or remove them manually.
What Setting Should Be Used?
In choosing your default setting, consider whether more of your content will be restricted than unrestricted or vice versa. Set the default setting accordingly. Then you can override that for any posts that are opposite of the default setting.