• Skip to primary navigation
  • Skip to content
  • Skip to primary sidebar

RocketGeek

Home of WP-Members, The Original WordPress Membership Plugin

  • WordPress Plugins
    • WP-Members
      • FAQs
      • Quick Start
      • Documentation
      • Extensions
    • Advanced Options
      • Documentation
      • Purchase the Plugin
      • Get the Pro Bundle
    • Download Protect
      • Documentation
      • Purchase the Plugin
      • Get the Pro Bundle
    • Invite Codes
      • Documentation
      • Purchase the Plugin
      • Get the Pro Bundle
    • MailChimp Integration
      • Documentation
      • Purchase the Plugin
      • Get the Pro Bundle
    • PayPal Subscriptions
      • Documentation
      • Purchase the Plugin
      • Get the Pro Bundle
    • Security
      • Documentation
      • Purchase the Plugin
      • Get the Pro Bundle
    • Text Editor
      • Purchase the Plugin
      • Get the Pro Bundle
    • User List
      • Documentation
      • Purchase the Plugin
      • Get the Pro Bundle
    • User Tracking
      • Documentation
      • Purchase the Plugin
      • Get the Pro Bundle
    • Memberships for WooCommerce
    • WordPass
  • Store
    • Cart
    • Checkout
  • Blog
    • Basics [Free]
    • Tips and Tricks
    • Filters
    • Actions
    • Code Snippets
    • Shortcodes
    • Design
    • Release Announcements
  • Contact
  • Sign In
  • Show Search
Hide Search
Home » Plugins » WP-Members » Documentation » Login/Logout Menu Link

Login/Logout Menu Link

As of WP-Members 3.2, the plugin allows you to create a menu item that will change to a logout link when the user is logged in. Generally, this is intended to provide a link to the login page when the user is not logged in.

Setup

Create your menu item for linking to the login page.

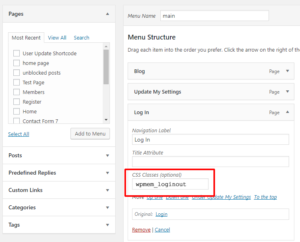
In the WP Admin panel, go to Appearance > Menus.  Add a menu item like you normally would.  If you already have a login page created, locate your page and click “Add to Menu”.

The label for your page is not critically important for this to work, but you probably want to make it something intuitive such as “Log In”. The part that is critical, however, is the CSS class given to the menu item because it needs to match the script used in the plugin.

To add the CSS class, open the menu item and under the “CSS Classes” heading, insert “wpmem_loginout” (see screenshot).

Be sure to click “Save Menu” to save your changes.

Using Cloned (Logged In) Menus

There is no need to use this feature when using cloned menus. The login/out menu link uses JavaScript to rewrite the menu text and link when the user is logged in.  If you are using cloned menus, it is simpler to just put a login link in your logged out menu and a logout link in your logged in menu.

  • Getting Started
  • Recommended WordPress® Settings
  • Plugin Settings
    • Options
    • Fields
    • Dialogs
    • Emails
  • Managing Content
    • Restricting Posts
    • Restricting Pages
    • Show Excerpts
    • Custom Post Types
  • Managing Users
  • Registration
    • Choosing Fields
    • Create a Registration Page
    • Moderating Registration
    • Using CAPTCHA
    • Turn Off Registration
  • User Profile
  • Membership Products
  • Menus
    • Logged In Menus
    • Login/Logout Menu Link
  • Customizing Emails
    • Email Address
    • Email Content
    • Email Format
    • Email Shortcodes
    • Email Troubleshooting
  • Customizing Forms
    • Create a Custom Stylesheet
    • Using the WordPress Customizer
    • Login Form HTML
    • Registration Form HTML
    • Widget Login Form HTML
  • Shortcodes
    • Pages and Forms
    • Login Status
    • User Fields
    • Email
    • Other Shortcodes
  • API Functions
  • Filter and Action Hooks
  • WP-Members FAQs
  • Demo Videos

Ready to get started?

Join Today!

© 2019 · butlerblog.com · RocketGeek is built using WordPress, WP-Members, and the Genesis Framework

  • butlerblog.com
  • WP-Members Support Subscription
  • Terms of Service
  • Refund Policy