Login Options
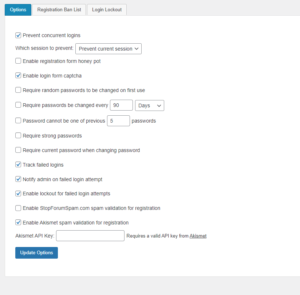
Prevent Concurrent Logins
This setting will prevent any login from being used in more than one browser concurrently. This includes additional computers and locations. The primary purpose of this options is to prevent login sharing. While it is impossible to prevent login sharing 100%, this makes it more difficult since one user logging in will automatically log that username out in any other existing session.
When this setting is enabled, you can choose from two possible options:
- Log out first session – logs out the original session, allowing the current login to proceed.
- Prevent current session – prevents the current login and leaves the original session intact.
Enable Login Form Captcha
While captcha in the login form is not necessarily recommended, it is one of the most requested features. Enabling the captcha setting will utilize whatever captcha is set in the main WP-Members Options.
Track Failed Logins
This option will track all failed logins. You also have the option to be notified as the admin when a failed login occurs.
Notify Admin on Failed Login Attempt
This allows you to notify the site admin via email when there is a failed login attempt. The email message can be edited in the WP-Members Emails tab under the heading “Failed login admin notification”.
The email allows for some additional email shortcodes that can be used (these are in the default demo message, which you can customize as needed):
- [user_ip]
- [blogname]
- [timestamp]
- [username]
- [error_code]
- [error_message]
Enable Lockout for Failed Logins
Adds additional settings to lock out a user after too many failed login attempts. Prevents brute force login attempts.
Password Options
Require Random Passwords to be Changed on First Use
This setting will set a flag when a random password is generated so that when a user logs in with that random password, they will be prompted to change it before continuing to use the site. This is implemented it two places. First, in the plugin’s default configuration where a random password is sent to the user upon registration; and second, if a forgotten password is reset. This adds a layer of security by requiring the user to set a password themselves once they have logged in with the random password.
Require Passwords to be Changed Every X Period
Similar to the above process, if a password is expired, the user will be required to change it to continue using the site. You can specify the time period required for password expiration. When this setting is used, anytime the user changes their password (or if a password is randomly set via registration or forgotten password reset), a new timestamp is set. Anytime the user logs into the site, the timestamp of the last password change is checked against the expiration period.
Previous Passwords
This setting restricts a user from re-using passwords. You may specify the number of previous passwords recorded (i.e. password cannot be one of the 5 most recent passwords used).
Minimum password strength
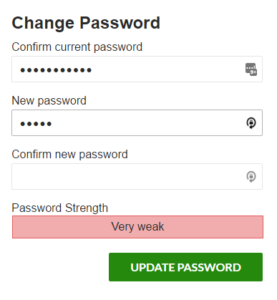
Enabling this option will include the WordPress password strength meter in the form. The form will not be able to submit until the password meets the selected minimum strength.
When used, the meter will be included wherever the password is entered. The primary location for this is in the change password form. But, if a password field is used in the registration form to allow the user to set their own password at registration, the password meter will also be included there.
IMPORTANT: If using a password field in the registration form along with this setting, you MUST include a confirm password field for the password meter to work correctly.
The password strength meter is WordPress’ internal strength meter. It uses the zxcvbn library. While it is somewhat technical, the article here gives a good description of the zxcvbn library’s concepts and a description of what is insecure about LUDS (lowercase, uppercase, digit, special character) password models. There is a demo here that shows you how various password compare using the model. (That’s a demo of the password strength library, not the plugin’s use of it. If you want to know how it works, it’s the same meter that can be found in the WordPress user profile edit screen.)
Include generate password button
This setting adds a generate password button to the form. It will remove the confirm password field. You may need to apply CSS to adjust it to match your form style. You can do this with the WordPress Customizer.
Confirm Current Password
When this setting is enabled, the change password form will include a confirm current password field. The user will be required to enter their current password in order to change the password.
Anti-Spam Options
Enable Registration Form Honey Pot
A honey pot is a form field that is hidden from human users. To a bot or an automated registration, this form field will look like any other form field to be completed. Bots will generally enter data in a honey pot field. When the registration form is submitted and data validated, if the honey pot contains an entry, an error is returned preventing the registration from occurring. A honey pot is the most effective method of stopping registration spam – more effective than CAPTCHAs. It has the added benefit of being hidden from users and thus presents a far better user experience than including a CAPTCHA.
For general information on what a honey pot does and how it works, see this post.
StopForumSpam and Akismet APIs
Enabling either of these options will run the username, email address, and IP address of each registration through that system’s API to determine whether it is likely spam. This, coupled with a honey pot is far more effective than a captcha on the registration form.
Delete database tables
When this is enabled, any custom database tables the plugin installs will be removed when the uninstall routine is run (“delete” in the WP plugin screen). This removes the failed login tracking and login lockout tables.


