Once the main list is implemented, if you wish to have detailed profile pages for each user, you can create a link to an optional detailed user profile page. For this feature, you will need to create a separate page and add the following shortcode:
[wpmem_ul_profile]
IMPORTANT: [wpmem_ul_profile] cannot be used alone. It is only used for displaying additional detail for a specific user from the main list.
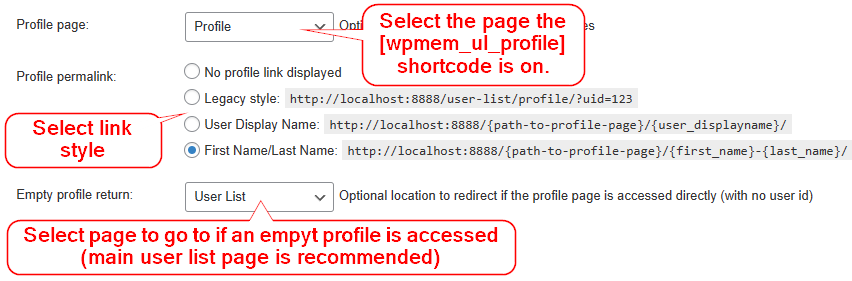
To complete proper setup of the profile shortcode, you must define its location in the plugin’s settings. There is a selector in the admin panel for you to define a profile page (if used). Set this to the location of the page you have placed this shortcode on. The setting will create a link at the H2 heading in the main list that passes the user ID to the profile page.
Parameters for Profile Detail Shortcode
The profile shortcode accepts a number of attributes (see list below). Several of these are selectable in the plugin’s options and do not need to be defined in the shortcode unless you’re deviating from what you have set in the plugin’s options. Others are specific to the HTML displayed (such as div and span tags). There is default HTML defined, and it is not recommended to use these unless you have a specific reason to do so (such as integrating with your theme’s existing styles).
It is recommended that you use the bare shortcode with no attributes first and get as much of it configured and styled with the available options prior to applying any of the following attributes.
- fields – the fields that you wish to display for the user’s profile. These correspond to the option name (meta_key) of any fields you have set up in WP-Members. Values should be comma separated with no spaces (i.e. “user_login,user_email,first_name,last_name”) Example: [wpmem_ul_profile fields=”user_login,user_email,first_name,last_name”]
- show_empty – shows or hides empty fields. Defaults to true (show).Example: [wpmem_ul_profile show_empty=”false”]
- avatar – the numeric value of avatar size in pixels (i.e. 20 would make the displayed avatar 20px x 20px). Use a negative value for no avatar.Example: show a 80px square gravatar [wpmem_ul_profile avatar=”80″]
Example: do not display a gravatar image [wpmem_ul_profile avatar=”-1″] - labels – true|false – determines if the field names are displayed as labels (i.e. First Name: Bob). Defaults to false.Example: [wpmem_ul_profile labels=”true”]
- id – the numeric ID of a user for which the profile will be displayed. By default, this value is passed to the page in a querystring. But you can display a profile for a specific user by setting this value. Value should be an integer corresponding to a user ID in the wp_users table.
- div – true|false – determines if the fields should be wrapped with a <div> tag. Defaults to true.
- div_id – sets an id for the <div> tag (if used).
- div_class – sets a class for the <div> tag (if used). Defaults to “field-name”.
- span – true|false – determines if the fields should be wrapped with a <span> tag. Defaults to false.
- span_id – sets an id for the <span> tag (if used).
- span_class – sets a class for the <span> tag (if used).
- main_div_before – applies a <div> wrapper to the entire profile. Defaults to “<div id=”user-list-profile”>”.
- main_div_after – applies a closing </div> tag to the main wrapper set above. Defaults to “</div>”. Should be the closing value of whatever is used in main_div_before.
Examples
This example would show fields with the meta keys first_name, last_name, user_email, and user_url. It will show labels for these fields and if the field is empty it will still display the label with no value (indicating an empty field). No avatar is displayed.
[wpmem_ul_profile fields=”first_name,last_name,user_email,user_url” show_empty=”true” labels=”true” avatar=”-1″]