WP-Members 2.8.5 was released today. This version is a minor update.
For all users, the following updates are part of the 2.8.5 release: Continue Reading →
Home of WP-Members, The Original WordPress Membership Plugin
WP-Members 2.8.5 was released today. This version is a minor update.
For all users, the following updates are part of the 2.8.5 release: Continue Reading →
I am normally hesitant to publicly release anything that is not an actual production version, so it is rare that I release beta versions of the plugin to the general public. It is rarer still that I release an alpha version. However, in the case of the WP-Members Subscription Module with PayPal Integration, there are a number of reasons why (1) I am releasing it and (2) I am labeling it as an alpha release. Continue Reading →
The PayPal Subscription extension allows WP-Members to limit a user to a specific subscription period and allows you to charge for subscriptions using PayPal’s IPN.
This extension is available with the WP-Members Pro Bundle, WP-Members Lifetime Support, or is also available individually.
Note: The PayPal Extension requires the PHP cURL library be enabled. If you are not sure what this is or if it is enabled, check with your host.
The PayPal subscription extension utilizes the PayPal Instant Payment Notification (IPN) system to notify your site that a user has paid and to extend their subscription expiration date accordingly.
The registration flow when using the extension is as follows:
It is important to note that while a user account is created for the user, they are unable to view any restricted content until their payment is processed by PayPal and the IPN is successfully passed. The user is still able to log in and view their profile which will indicate that they have not completed payment. This way, if they leave the registration process without completing payment they can return to complete payment later. Until they actually complete payment, they will not be able to view any restricted content. Instead, they will be presented with a message indicating they need to complete payment and a PayPal payment button.
This extension installs as a plugin. Download the installation package as a zip file, then use the new plugin uploader or unzip the package and FTP transfer to your plugin’s folder.
Once the extension is installed, go to Plugins > Installed Plugins to activate.
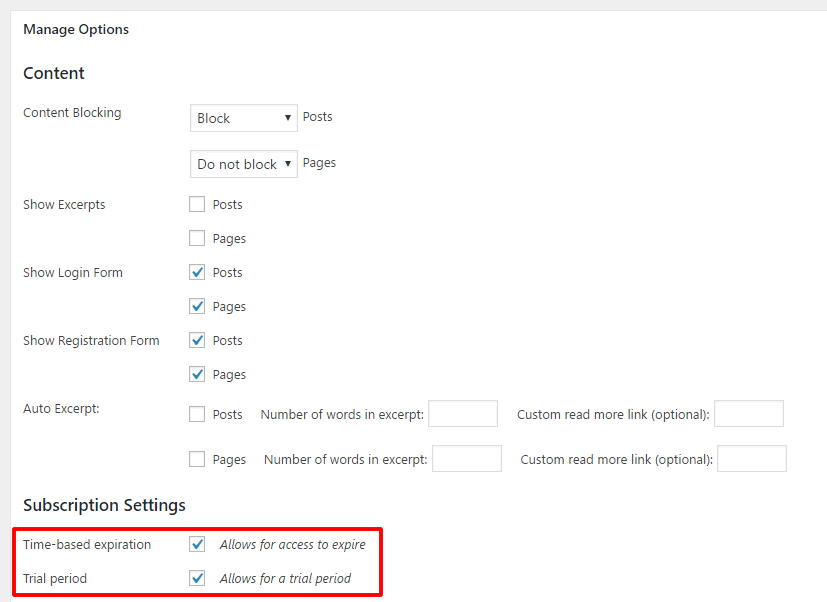
To set up the PayPal Subscription extension go to the WP-Members Options tab and indicate that you are using time-based expiration. You will notice that with the inclusion of the extension, there are two additional settings available; one for time-based expiration and the other for offering a trial period. Select trial period only if you are offering a trial period for your subscription. These settings are highlighted in red in the image to the right.
Next, configure the extension’s options. These are found in the Subscriptions tab.
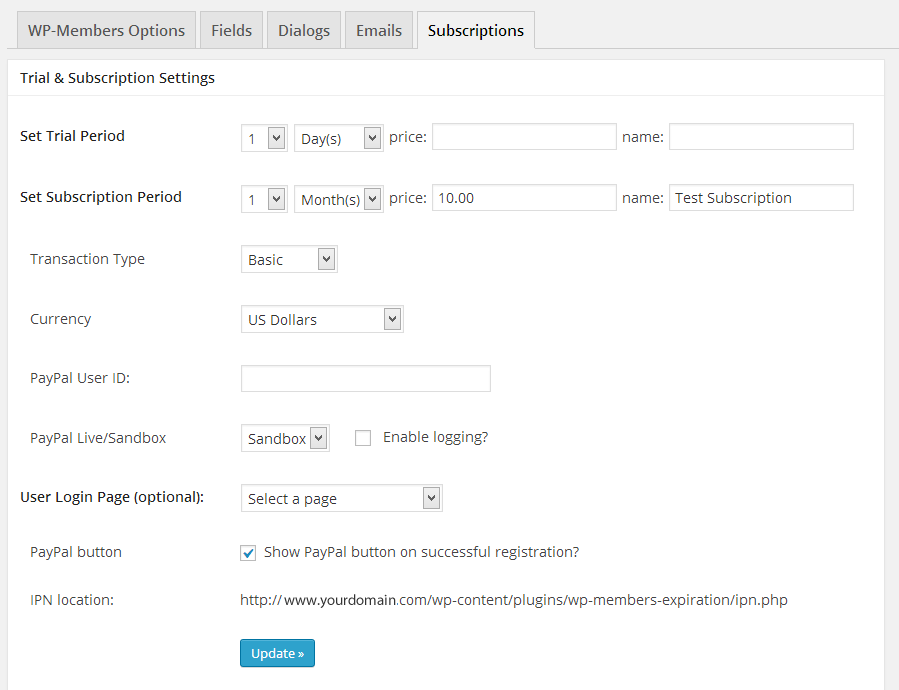 Set the time period, price, and name for your trial period (if used) and regular subscription period. Indicate the currency the price is in, and the type of transaction you will use (basic/regular billing or automated recurring billing).
Important: Recurring billing is not available for personal PayPal accounts. You must have a business account to use recurring billing.
You will need to indicate your PayPal User ID and whether this is live or sandbox. Your PayPal User ID is the primary email address associated with your account. It will not be a merchant ID which would be a series of numbers and/or letters.
Note the following:
It is highly recommended that you test your setup with the PayPal sandbox prior to going live. This will allow you to make sure that PayPal can find your IPN listener and that the IPN listener if functioning correctly.
If you have difficulty getting transactions to work in the sandbox, you may wish to enable logging with the toggle in the settings. This will allow you to gain some additional information on what is being sent through the IPN. An additional testing step may include using the PayPal IPN simulator (more on this in the section on the PayPal developer tools below).
If you want to include a login page for the return from PayPal, set this page in the optional setting.
If you are not using a free trial, it is recommended that you set the extension’s settings to display the PayPal payment button in the successful registration message.
You may enable basic logging for tracking problems with the IPN by checking “Enable logging” in the extensions settings tab. This will create a log file for you in the plugin’s folder. As data is written to the log, it will be displayed on the plugin’s settings tab below the settings. Essentially, it will indicated the time of the transaction, the status, and the action (which should indicate the user ID and that the user’s expiration date was moved forward).
It is not recommended that you continue to use the log file on a live system once you know you have things functioning. This is primarily for debugging potential IPN issues. You should use it when using the sandbox, and maybe when you first set up live transactions just to verify you are working.
You can clear the log file by checking the box “Clear Log File” and submitting.
When you are finished with the log file, you can delete it. Turning off logging will also remove the log file.
In instances where a complete log of all IPN information is needed (usually only in the case of troubleshooting difficult issues), “verbose” logging can be enabled using the wpmem_exp_ipn_defaults filter hook.
The log file will alert you to specific errors that may occur in a transaction. The are the following:
The extension adds a line to the WP-Members custom fields in the individual user profile to indicate the user’s subscription status.
When the user first signs up, they will be listed as pending until they complete payment.
![]()
![]()
Once the user completes payment, it will indicate their subscription status (subscription or trial) and their expiration date.
![]()
![]()
In all cases, you have the option of extending their expiration date or expiring the user. Expiring the user will set their expiration date to now minus one day.
Users can be expired from the bulk users actions available on Users > All Users. You can also expire individual users from the user table as the extension adds an expiration link to the hover menu. Expiring the user will set their expiration date to now minus one day.
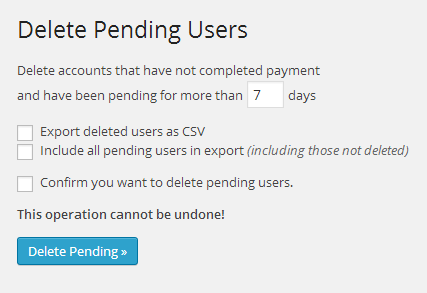 To delete users that are older than X days old, select Users > Delete Pending in your WP admin menu.
You may also select to export the list of users that you delete as a CSV (select “Export deleted users as CSV”).
If you want your export file to include ALL pending users – those deleted and also those that are not deleted – select “Include all pending users in export.” Those users that are deleted will be marked as such in the export file.
Because this involves the deletion of users from the database, you must confirm that you intend to execute this action.
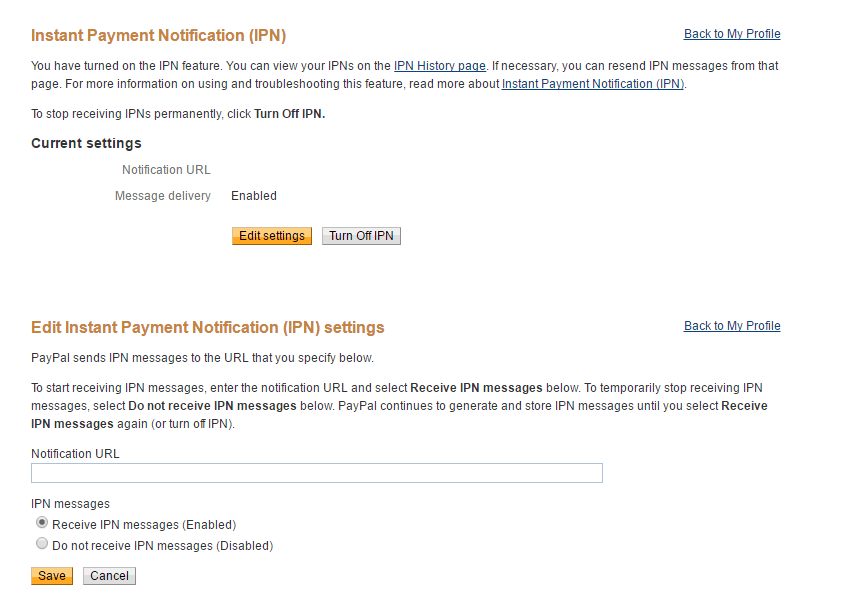
 You will need to turn on IPN in your PayPal account and set the location of your IPN listener.
Depending on your PayPal account type, you should see a select for “Seller Preferences” on your main page. This will likely be on the left hand side under a menu heading “Selling Tools.” Click on “Seller Preferences” to get to the Seller Preferences screen.
This should give you your account profile. One of the line options should say “Instant payment notifications” with a link to update your settings.
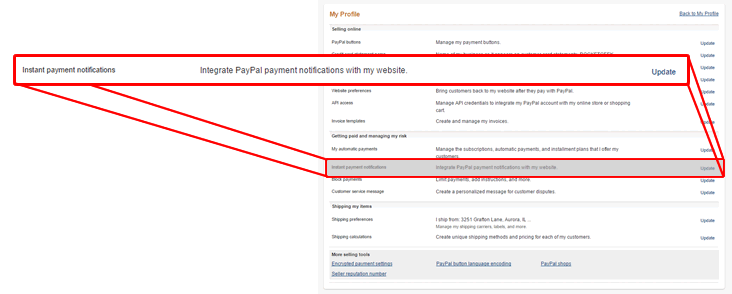
When you click update, you will have a screen that indicates your IPN settings. Make sure IPN is turned on! If there is no notification URL, or it does not match the location indicated in the extension’s subscriptions tab, click edit settings and add this location in the Notification URL box. The image below shows these two screens. Again, make sure you’ve entered the correct IPN listener location for notifications and that you have enabled IPN messages.
It is highly recommended that you test your setup with the PayPal sandbox. You use this by going to http://developer.paypal.com and creating a developer account. Once you have an account, you can login and go to Applications > Sandbox Accounts.
In the sandbox, you will need to create at least two accounts, one for the merchant and one for the buyer. Use the merchant for the User ID in the extension’s settings when you are testing with the sandbox. Use the buyer account to “pay” for the subscription when testing the registration process. That test user should receive a valid transaction and have their expiration date set according to your subscription period. If so, good – you can go live. If not, then you should do additional testing to see why the transaction did not work.
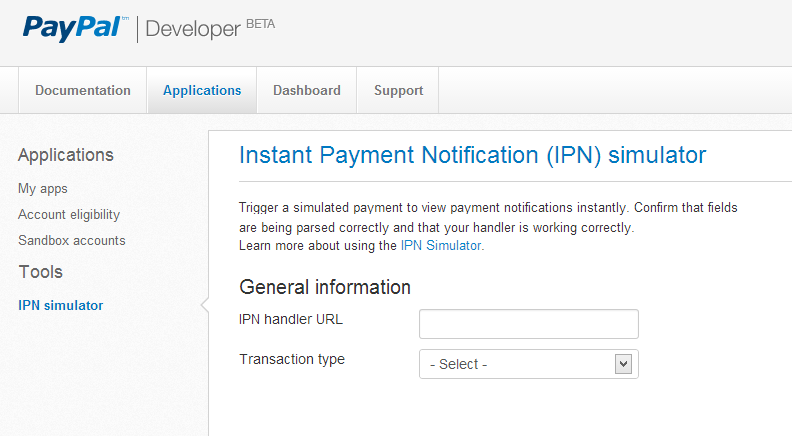 You can also use Applications > IPN Simulator to send a simulated IPN transaction without actually registering a user. This will allow you to determine if PayPal can see your IPN and the IPN is properly functioning.
There are two tests for the IPN Simulator. The first is a quick test to verify that the IPN listener can respond to the system. This is to verify the “handshake.” This will tell you if PayPal can see and connect to your listener.
There will be a large amount of options in the form. You can leave all of these as-is if you are just testing to make sure the IPN handshake can be verified.
Send through this test with just the defaults. You should get an indication of a valid IPN test if it finds the listener and the listener responds. If not, you may need to troubleshoot why it can’t find the listener. (NOTE: your test site MUST be out in the open for this to work and the domain must be valid. If you are testing on localhost or some test system that is not open, PayPal won’t be able to see it and you won’t be able to test it).
If the handshake is verified and things are working, you can send a more detailed test to make sure that user expiration dates can be set appropriately. Use the same settings as 1-3 above, and add the following:
If you get a successful IPN transaction, then take a look at the user’s expiration in their profile. You should see the expiration advance by one unit of time.
Once you’ve tested the IPN and it works, you can go live and use your regular PayPal ID (should be an email address – not a numeric merchant account number).
The following is a list of hooks that are in the extension.
You can purchase a license for this plugin in the RocketGeek.com Store.
The following is a list of shortcodes that may be used in the email messages. Note: some shortcodes are only available in the admin message, and it is up to you to make sure that proper information is sent (i.e. if you remove [password] from the registration email, the user will not receive a password and thus not be able to login). The plugin installs with defaults for each of these messages to provide you with an example of what is available.
Any field option name can be used as an email shortcode in both emails to users and admins. So if you have a custom field with the option name “my_field” you can use this in the email as [my_field].
If you have a need for a custom shortcode beyond this, custom shortcodes can be added with the wpmem_email_shortcodes filter.
Some important things to consider:
The plugin installs with certain default settings and email content. Based on your chosen way of using the plugin, you may need to alter the email content to make sense. Here are some important considerations.
If you have additional dynamic content from outside the plugin that needs to be included in your email to a user, there are filters available for this.