• Skip to primary navigation
  • Skip to main content

RocketGeek

Home of WP-Members, The Original WordPress Membership Plugin

  • WordPress Plugins
    • WP-Members
      • FAQs
      • Quick Start
      • Documentation
      • Extensions
    • Advanced Options
      • Documentation
      • Purchase the Plugin
      • Get the Pro Bundle
    • Download Protect
      • Documentation
      • Purchase the Plugin
      • Get the Pro Bundle
    • Invite Codes
      • Documentation
      • Purchase the Plugin
      • Get the Pro Bundle
    • MailChimp Integration
      • Documentation
      • Purchase the Plugin
      • Get the Pro Bundle
    • PayPal Subscriptions
      • Documentation
      • Purchase the Plugin
      • Get the Pro Bundle
    • Salesforce Web-to-Lead
    • Security
      • Documentation
      • Purchase the Plugin
      • Get the Pro Bundle
    • Text Editor
      • Purchase the Plugin
      • Get the Pro Bundle
    • User List
      • Documentation
      • Purchase the Plugin
      • Get the Pro Bundle
    • User Tracking
      • Documentation
      • Purchase the Plugin
      • Get the Pro Bundle
    • Memberships for WooCommerce
    • WordPass
  • Blog
    • Basics
    • Tips and Tricks
    • Filters
    • Actions
    • Code Snippets
    • Shortcodes
    • Design
    • Release Announcements
  • Store
    • Cart
    • Checkout
  • Contact
  • Log In
  • Show Search
Hide Search
Home » Search for "customizer"

Search Results for: customizer

Using the WordPress Customizer

The login, registration, and widget forms can be viewed in the “logged in state” when using the WordPress Customizer. The Customizer is a helpful tool that allows you to manage various WordPress options visually, and it can be used to apply custom CSS for your forms, especially if you just need to make a few minor changes.

  • To use the WordPress Customizer, make sure you are signed in. Then from the WordPress Toolbar on your site, select “Customize”, which will usually be to the left side of the menu. (NOTE: If you use a theme that supports Full Site Editing (FSE), you may notice this option is gone from the menu. You can add it back in with this simple trick.)
  • Once the Customizer is open, browse to a page that has the form you want to work on (such as login or register).
  • From the Customizer menu, select “WP-Members”. In the WP-Members Customizer menu item, you will have a checkbox to “show forms as logged out.”  Check that to allow the form to display.
  • Now you can begin customizing CSS for the form in the Customizer. Go back to the Customizer main menu and select “Additional CSS.”

Example of Using the Customizer

Here is an example of using the Customizer to create a custom property for the font weight of the login form label tag.

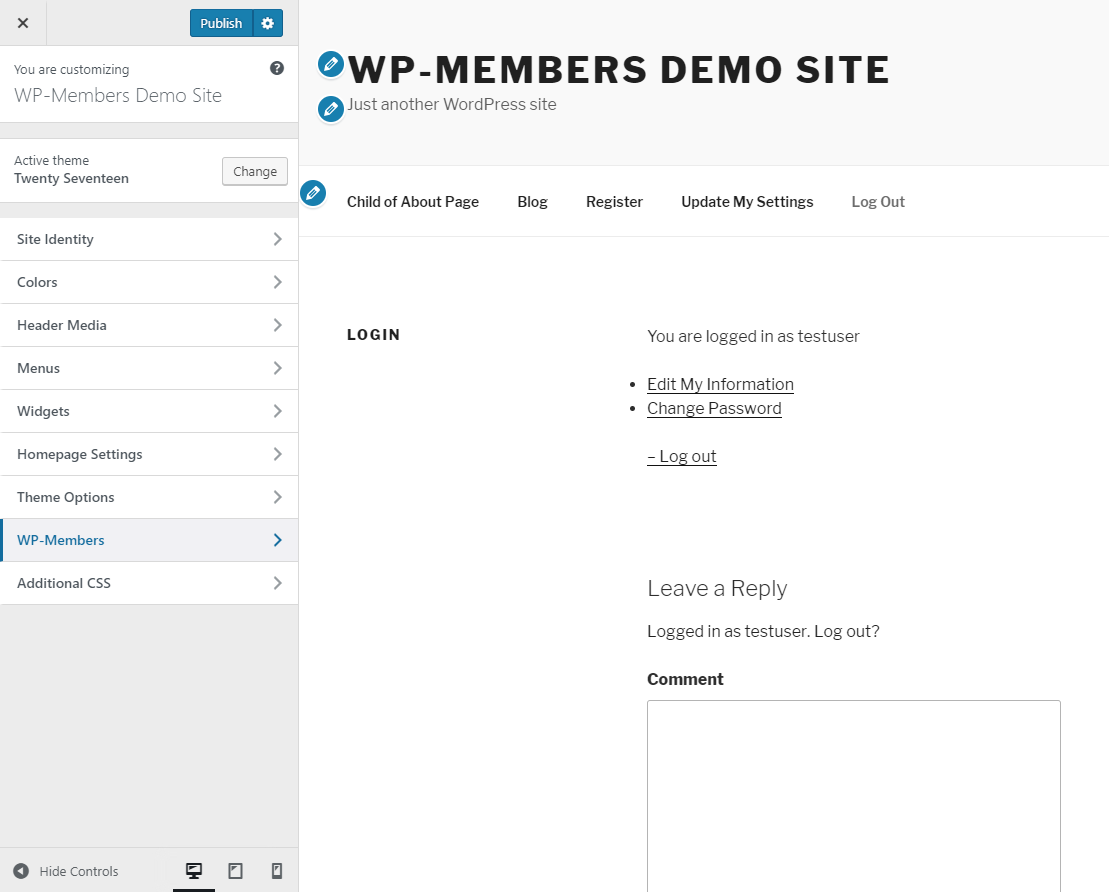
Browse the page containing the login form shortcode ([wpmem_form login]).  Make sure you are logged in and open the Customizer from the WordPress Toolbar. Click the WP-Members menu item in the Customizer (see image below):

With the WP-Members Customizer menu item open, check the box to “Show forms as logged out.”  The page should display the form as if you were not logged in (see image below):

Now you can go back to the main Customizer menu (click the back arrow next to “Customizing WP-Members” in the upper left of the Customizer). Now select “Additional CSS” from the Customizer menu.  This will open the Custom CSS area.  You may also want to use the browser inspector to help you identify certain elements.  To do that, right click the “username” label in the form (which is what we are going to customize in this example).  Your inspector may display to the right or the bottom depending on your settings. In this screenshot, we have it set to display across the bottom.  Note by looking at the “label” tag properties to the right that the font-weight is 800.  We will change it to 300.

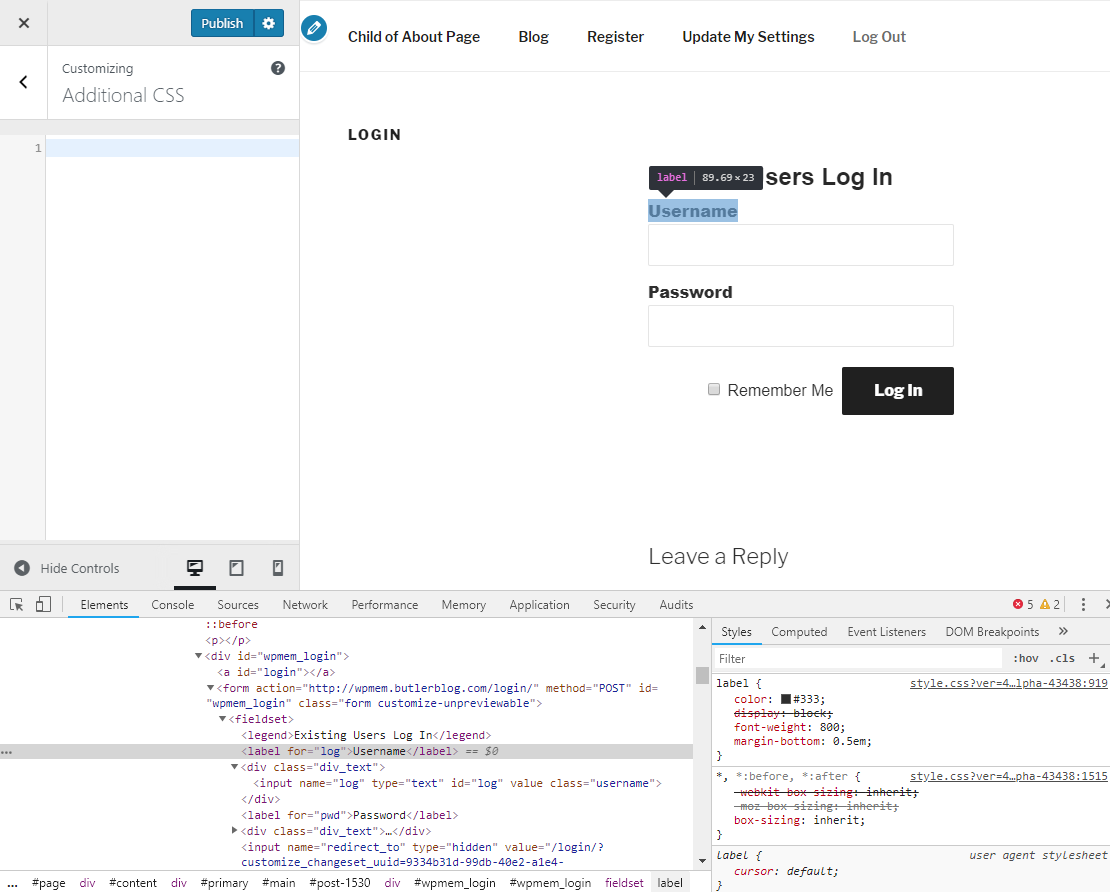
Take note of the HTML. A common question when customizing CSS for the WP-Members forms is, “What specific tag do I use to customize?” But all this information is in the Inspector for you. In this case, the form is wrapped with a div tag with the ID “wpmem_login” so we will specify #wpmem_login.  We will be customizing the HTML label tag so we’ll add “label” to our property.

In that definition, we will specify font-weight: 300;  Note that anything applied in the Customizer’s Custom CSS is loaded after any theme or plugin styles so that the Customizer CSS will be the priority (latest has priority) without the need for a messy !important property.  AND the Customizer Custom CSS is a live view so you’ll see what the change looks like right away.  That way you can make adjustments as needed without having the publish to see them.  But don’t forget to click “Publish” when you are done so that it saves your changes!

Once you publish your changes, they will be applied live.  If you log out of the Customizer and from WordPress and browse to the login page, you’ll see your change applied.

Use this feature to customize your forms and other elements in the plugin to blend more seamlessly with your theme without the need to create and load a custom stylesheet for the plugin.  Keep in mind that depending on the level of customization you are applying, working with an entirely custom stylesheet for the plugin may be necessary.  But for simple changes, use the Customizer.

WP-Members Security 1.4.0

Chad Butler · Sep 13, 2022 ·

This article is provided free. Find out how you can get full access to premium content, including how-to articles and support forums, as well as priority email support and member exclusive plugin extensions..


The WP-Members Security plugin has been updated to version 1.4.0. There are some important bug fixes in this release as noted below.

Continue Reading →

How to customize the profile links

Chad Butler · Mar 9, 2022 ·

This is a tutorial article on how to customize the profile links for the logged in state of the [wpmem_profile] shortcode. We will focus on different ways to approach it, all of which use the wpmem_member_links_args filter hook.

Continue Reading →

WP-Members 3.4.0 – WOW!

Chad Butler · Dec 14, 2021 ·

This article is provided free. Find out how you can get full access to premium content, including how-to articles and support forums, as well as priority email support and member exclusive plugin extensions..


You asked – RocketGeek listened!

WP-Members 3.4.0 is released today and it packs the biggest updates and changes that I have released in quite a while.

Most of the features are based on either direct user requests or on refining aspects of the plugin that users have given feedback on. And not only are there new and improved features, but as usual, when I reach a major plugin update (i.e. 3.3.x to 3.4.x), I do a complete code review to make sure the plugin’s codebase does not become unnecessarily bloated and to find areas that code can be tightened and improved.  That includes a complete security audit as well.

Here’s a rundown of what is in store for you in WP-Members 3.4.0! 

Continue Reading →

Individual Menu Item Settings

Compatibility notice: This feature relies on a WordPress action hook that is not included in WP’s FSE (Full Site Editing) menus. This only works with menus that use wp_nav_menu_item_custom_fields.

You can set display options for individual menu items to identify whether a menu item displays to a logged in user, logged out user, or all users.

If you are also using defined memberships, you can set which memberships a menu item may display to, in addition to logged-in/logged-out options.

Menu settings are available when editing individual menu items under Appearance > Menus.  They do not currently display when viewing menu items in the Customizer.

  • Page 1
  • Page 2
  • Page 3
  • Go to Next Page »

Ready to get started?

Join Today!

© 2025 · butlerblog.com · RocketGeek is built using WordPress, WP-Members, and the Genesis Framework

  • butlerblog.com
  • WP-Members Support Subscription
  • Terms of Service
  • Privacy Policy
  • Refund Policy