I do get requests from time to time about how to put form elements side-by-side. This example will show you how to take the default login form, apply a wrapper for the rows, and some CSS that will handle the layout.
Please keep in mind that this is a generic example. At some point, you may need more (or less) to integrate exactly as you want it to be in your particular theme. If you want to get the most out of how this process works, don’t just plop it into your production site expecting it to work. Try this out as a test with a simple theme. My example screenshots come from this exact code using the Twenty Fifteen Theme.
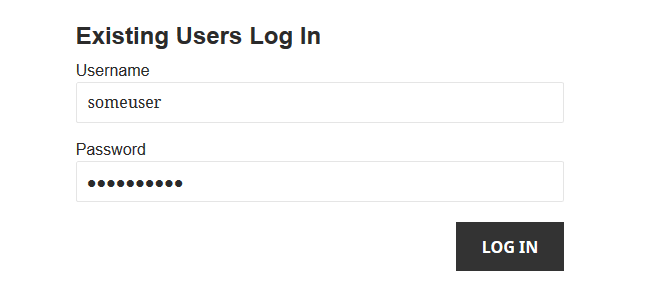
Here is the default login form in the main content area:
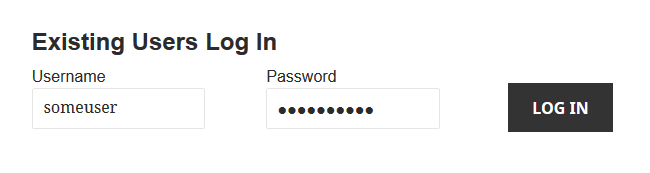
Here is a screenshot of what we will create:
In order to have a handle for each input, I needed a wrapper that went around the label and the input tag for each form element (one for username, and one for password). That can be added using the filter wpmem_login_form_args.
wpmem_login_form_args allows you to override some of the defaults that are part of the login form building function. See the documentation for the filter for a list of what these are.
In order to use the filter, you only need to pass in the values you are overriding. In this case, we are overriding the row_before/row_after pair (null by default) and remember_check (a true|false boolean, true by default, to display the remember me checkbox).
The row_before/row_after we will apply gives use a div around the label and input to keep them together and allows us to give it a custom class we can apply some CSS to. The remember me checkbox I removed to make this a simple to implement form. To keep it in there would make this a much more complex example.
Here is our filter function you can add to your functions.php file:
/**
 * Set up custom arguments using wpmem_login_form_args
 *
 *  * add a wrapper for rows (row_before & row_after)
 *  * remove the remember me checkbox (just login button)
 */
add_filter( 'wpmem_login_form_args', 'my_login_form' );
function my_login_form() {

	$args = array(
		'row_before' => '<div class="login-form-row">',
		'row_after'  => '</div>',
		'remember_check' => false
	);

	return $args;
}
Now that the extra HTML is applied with the filter, we need to apply our custom CSS. For the sake of cut-and-paste simplicity, I have used the wp_head filter to just drop it into the document head section. There are other, and perhaps better, approaches to adding custom CSS. But I didn’t want this to be a discussion of how to apply custom CSS but rather focus on the specific objective – side-by-side form elements.
The CSS I am applying is relatively simple. First, the row wrapper we applied is class login-form-row. We float that with float:left.
The only other thing we need to do is override some of the existing CSS for the button. I made the width a little smaller (otherwise the div tag is wide enough to require a new line), float the element to the right, and adjust the top margin to align it with the inputs.
This can also be added to your functions.php:
/**
 * Custom CSS for custom login form elements
 *
 * Note: this just echoes the styles to the head.
 * This is not the "best" way to do it - the best
 * would be to include these styles in a stylesheet,
 * either custom for the plugin, or added to the
 * theme.  But it is the quickest way to just apply
 * some custom CSS for this example.
 */
add_filter('wp_head', 'my_login_form_styles');
function my_login_form_styles() {
	echo '
	<style>
		/* my custom login form styles */
		.login-form-row { float:left; }
		#wpmem_login .button_div {
			width: 18%;
			float: right;
			margin: 12px 0 0 0;
		}
	</style>';
}
That’s it! A quick and simple tutorial on how to apply a row wrapper with a custom CSS handle to allow you more complex layout options.